Image Editing from multiple photos to one single best
AbstractThis is an interactive web tool that make it easy to get the single best picture from multiple exposures taken within the same scene. With the tool it is possible to recompose a photo from a burst of images after the image is photographed. This is done by remove, add, swap or combine objects in each individual photograph into one reference photo. Supported web browsers are Chrome, Firefox and Safari although Chrome is highly recommended. Touch screen is currently not supported. |
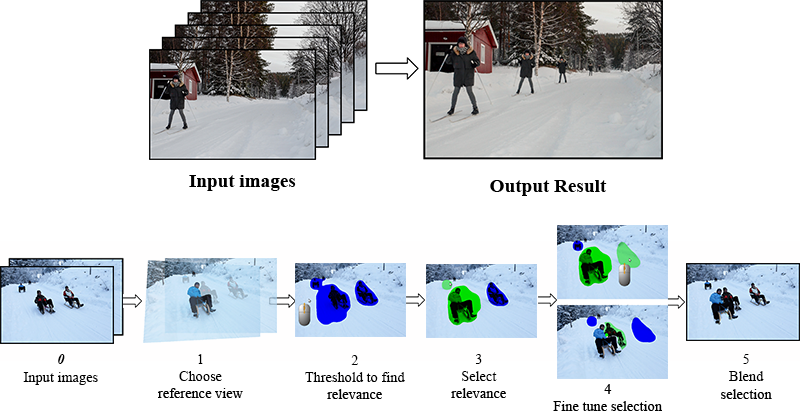
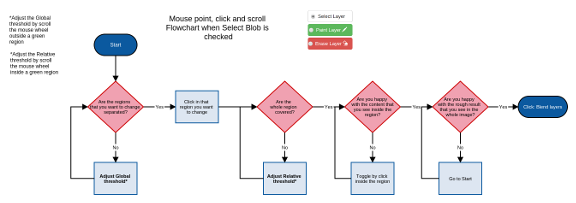
How to InstructionsThese instructions are for the Demo, the procedure are the same for the web App. To Explain the user interface we will take a step by step walk through. 

Use Case ExamplesRemove Content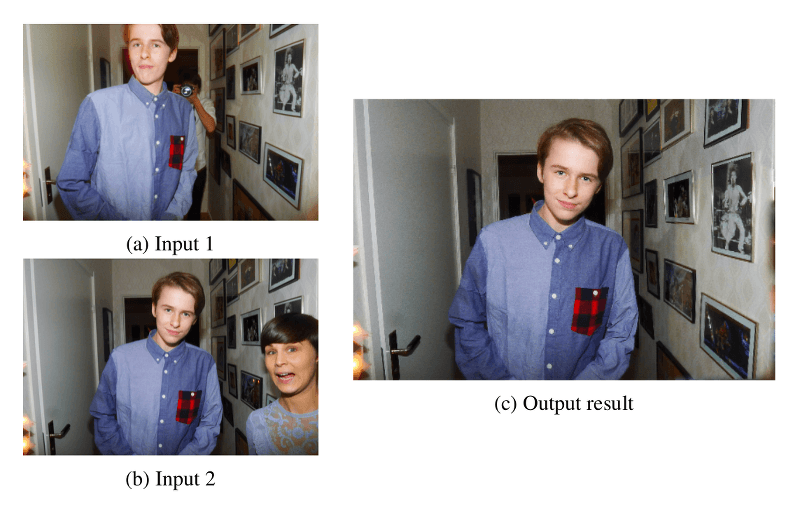
We have two photographs taken from a sequence of a two person portrait in a corridor seen in the figure above to the left. We decide that we only want a portrait of the person in the the blue shirt. Ideally we want to combine the exposure b down-left where we have that person looking more relaxed then on exposure a top-left, there is also other details like the photographer behind our protagonist who accidentally ended up in frame a. So in other words we want to remove the girl from image frame b. To do this we combine the two exposures and replace the girl to the right in frame b with the background wall from frame a to produce the Output result seen in figure c. Add content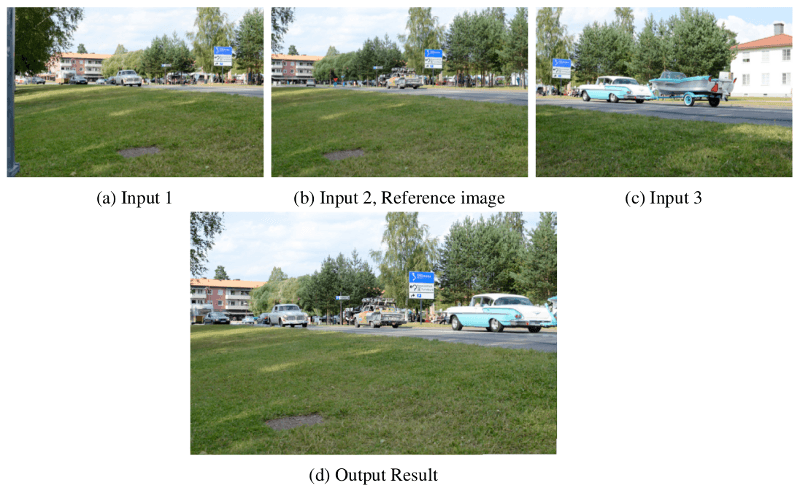
We have three photos taken from the same spot at slightly different times which essentially resulted in us capturing multiple cars. We have photographies of cars but in several different frames. The preference could be one single photo where as many cars as possible appear visible. Our goal is to put together details from multiple images into one single frame. Here we are adding details from our pictures into one reference image. So we select one reference view that will include an area of the multiple cars, this is the middle frame which also contains a car in the middle. Now we can combine the left cars from the left frame and the right car from the right frame to create the concise photo we are looking for, see figure d Duplicate Content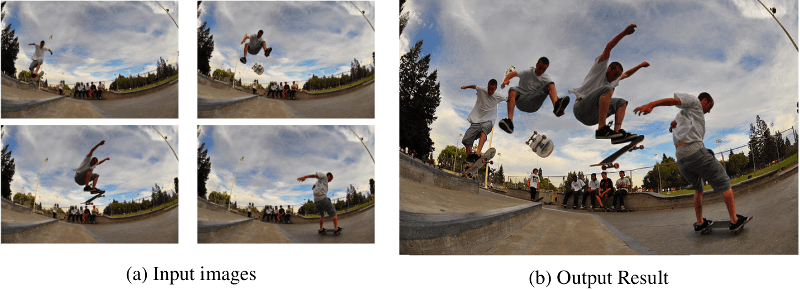
Here we want to capture the motion of two objects namely the skater and the skateboard in one single frame. The process is very similar to the previous example we are adding up details from several different pictures into one single frame, but the difference is that it is the same objects we are adding. Thus in this example we duplicate the two objects from our set of frames into one single frame. With this technique one can use several images to, for example "clone" people within a scene and thereby visualize their path of motion in one single-frame. Of course, the conditions are that we have appropriate data suited to the purpose in form of multiple photographies of the same scene and also taken from more or less the same viewpoint. And preferably, the scene in question should contain some form of dynamics. Introduction to BurstBurst mode is a good choise when it comes to photographing moving subjects. One example is shooting sports. Sports photography can be hard because sports move fast, the athletes move fast and the fields are big. With the camera in burst mode we can hold down the shutter and pan the camera along when the athletes movement. Putting the camera settings in to burst mode are good in other situations too. Animals and children are similar to athletes in the way that the move fast. You often only get one chance to capture a snapshot and to do this in a situation where many things happening at ones, to freezing the moment of a dynamic scene when everything looks right can be a harsh task. The success rate is usually low and therefore photographers need good software to to edit down the number of candidates to do post-processing in. It is here our proposal comes into play. Magcut is an image editor that let the user rearrange the photographed scene to maximize the visibility or to change the composition. This can be done in several ways either by adding and moving objects or by removing objects within the scene. Our application is suited for dynamic scenes where objects are moving. It also allows the camera to move slightly within a scene. We assume that the burst of images provided by the user contains some differences. That is, differences between each single image. MaterialsSource CodeThe source code and the data can be found on github in the Link. RelatedThe application uses image stitching. Please see The project Image Stitching with HTML5, canvas and JavaScript Demo page and/or the Source code for more information on stitching. |
magcut